3 Steps to Migrate from the Graphcool Web UI to the Graphcool Framework
I have been using Graphcool for about a year now and have had my Open Sauced for closer to 7 months now. The hosted version of Graphcool is amazing and everything I needed, at least until they announced the Graphcool Framework. This framework is a way to the build standards and better practices around getting GraphQL servers up and deployed.
Though I could continue using the web interface, the future of the platform is moving towards this framework. Graphcool, the company, took note that the web UI became cumbersome to navigate with larger teams and projects.
The Framework’s announcement post came with brief instructions on how to migrate to your existing Graphcool projects but it very limited. I did eventually find the instructions in the new Graphcool Framework documentation under the Legacy Console Projects section. This is my attempt to provide a more verbose guide for this migration with colorful commentary, but be sure to review the documentation before attempting to upgrade.
1. Install the framework
The framework can be install using npm.
npm install -g graphcool
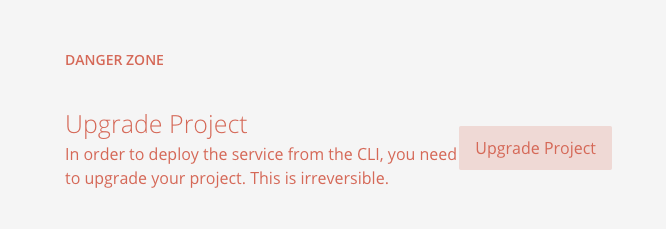
2. Upgrade your Project
In most cases upgrading a legacy Console project to a Graphcool service is a simple process. Before upgrading your legacy Console project to a Graphcool service, we recommend that you’re doing a “dry-run” of the upgrade process to get familiar with the new workflows.It is important to understand that once a project is upgraded to a Graphcool service, it can not be converted back to a legacy Console project again. This can not be reversed, I recommend a ‘dry-run’ the documentation recommends a ‘dry-run’. Find your Graphcool Id from your project settings to test out and follow the instructions from the documentation.
mkdir graphcool-cli-dry-run

cd graphcool-cli-dry-run

graphcool init --copy <legacyProjectId>;
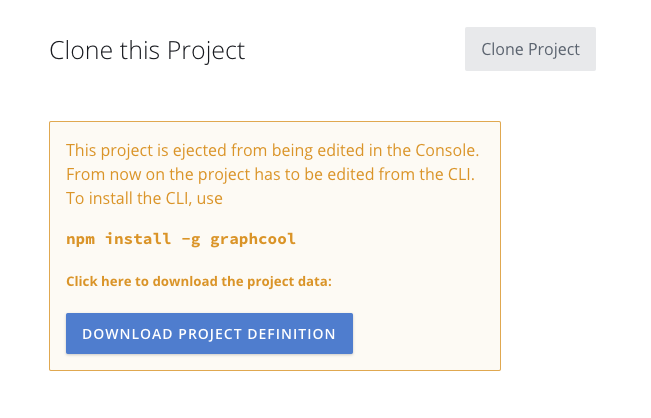
If you are pleased with the results of the dry-run and you receive no errors, proceed towards upgrading the project via the web UI. This will make your schema and console read-only but also do the necessary changes to make your project CLI ready and deployable.
Once you have upgraded your project, you will need to download the assets from that conversion to be used with the graphcoolCLI. The download will include a README, schema, and graphcool.yml, move the schema and YAML into the root of your project folder.
3. Deploy
Now that the graphcool schema and YAML are in the project folder you can now deploy using the CLI.Run the deploy command:
graphcool deploy
You should get a request to login via the web, this is a one time deal and be saved for future deploys. Graphcool defaults to hosting your database back on the Graphcool cloud infrastructure, but because we are now using the Framework directly we do have the option to use our own infrastructure from other providers, such AWS or Digital Ocean. If you have no errors in your schema you will see your existing Graphcool endpoint and a new .graphcoolrc file generated.
I personally had errors when deploying due to the schema using an older syntax, luckily I already had a PR from michaeljclausen fixing this. If you have been using GraphQL as long as I have you will have some issues in syntax, but it saves me from a little bit of work.
That is it, you now have the ability to choose a deployment strategy as well the ability to keep up with the latest Graphcool has to offer. I have plans to take advantage of Schema stitching and resolver functions.
View the result of me going through this process in PR #71 in the Open Sauce project repo.
If you would like to learn more about my project, check out this post I wrote on Netlify that goes into more detail. And of course, feel free drop by in the issues 😀